


DIP3 Status – July 2021
The DIP0003 deployment on mainnet started on July 1, 2021 and was confirmed by the miners on July 5.
For now the masternodes are still running in classic mode. Spork 15 needs to be sent for final activation. We are waiting until the majority of the masternodes have been switched. We also assume that there will be a wallet update with additional LLMQ values before that. Currently, different values are being tested in Devnet and Testnet.
Regardless of this, you can now prepare your masternodes for DIP3:
Masternode Upgrade
You need to update the daemon on your VPS and the local wallet to latest version 0.13.
1. Update Masternode Daemon
In this guide, we assume that the daemon is installed in “dms/” and the data in “.dmscore/”.
- Connect to the VPS via SSH.
- Enter the following commands:
wget https://github.com/Krekeler/documentchain/releases/download/v0.13.4.0/dmscore-0.13.4-x86_64-linux-gnu.tar.gz
tar -xzf dmscore-0.13.4-x86_64-linux-gnu.tar.gz
./dms-cli stop
rm dmscore-0.13.4-x86_64-linux-gnu.tar.gz # optional
./dmsd –daemon # if no auto start is set
# wait a minute
./dms-cli getinfo
# .. “version”: 130400 ..
2. Update Local Wallet
- Close “DMS Core”.
- Download the latest release (Windows, Linux or macOS) to your local computer and update “DMS Core”.
- Start “DMS Core”.
- Go to the tab and check the status. If necessary, start the corresponding masternode.
3. Bootstrap
If you update now after the DIP0003 deployment, the blockchain needs a resynchronization. To speed this up, you can download and install a database archive. The synchronization is then finished after a few minutes.
4. DIP3 Masternode Registration
The former classic masternodes were managed in parallel with the blockchain, data sharing and synchronization of the masternode lists was done using P2P messages. The new deterministic masternodes are integrated into the blockchain. The list is entirely based on special transactions, the Provider Registration Transactions (ProRegTx). You have to send a registration transaction to prepare the masternode for DIP3.4a. Simple Update (recommended)
Please follow the instructions for a one-click update.4b. Manual Registration with Debug Console (alternative)
- First, create a text document with the following content as a template:
My Documentchain Masternode (DIP3):
MN1-Payout: payoutAddress
MN1-Owner: ownerKeyAddr
bls secret: blssecret
bls public: operatorPubKey
proregtx: protxid
protx register_prepare collateralHash collateralIndex ipAndPort ownerKeyAddr operatorPubKey ownerKeyAddr 0 payoutAddress
signmessage payoutAddress signMessage
protx register_submit tx sig
- In the local wallet, choose the menu command .
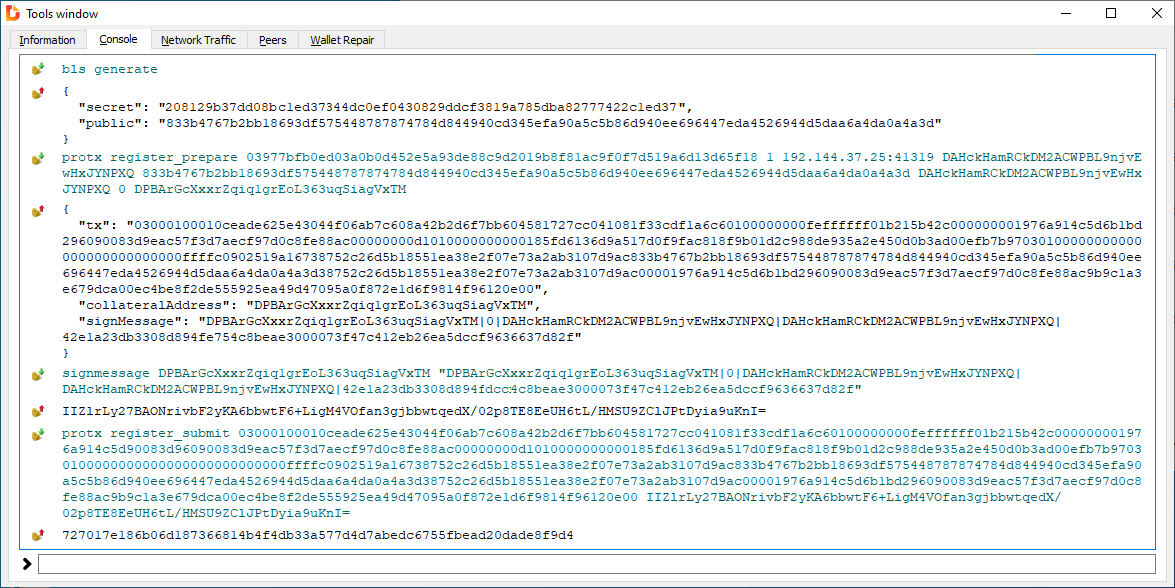
- Enter bls generate and press Enter:
"secret": "426e9ed21a27d1b8d0d08adf6bffc86f1cf86af3a26d78e0b6861f0778a1f604",
"public": "1766a7d5755f1e714e84c41a547d130f7789fad30a3856ef2f1b7a0bb09d8c4818d2a3a91d9bbb9fb3c9280cb84495b5"
}
- In the previously created template text document, replace "blssecret" with the returned value of "secret" and at two places replace "operatorPubKey" with the value of "public".
- The private key (secret) must also be entered in dms.conf on the VPS. Switch to the VPS and enter:
nano ~/.dmscore/dms.conf
Insert the following new line:
masternodeblsprivkey=426e9ed21a27d1b8d0d08adf6bffc86f1cf86af3a26d78e0b6861f0778a1f604
Please do not delete the old masternodeprivkey, this is still needed for classic nodes.
Save with Ctrl+O and exit with Ctrl+X. - Restart the daemon:
~/dms/dms-cli stop && sleep 10 && ~/dms/dmsd --daemon
Masternode Addresses
In addition to the already existing masternode address we need an owner address.
- In the local wallet, choose the menu command .
- Select the previously used masternode address (e.g. "MN1"). This is the address with the 5000 DMS Collateral, to which the rewards are also regularly paid. For a better overview, this should be renamed to "MN1-Payout" or similar. In addition to the locked 5000 DMS, this address also needs a small available amount for the following transaction fee.
- In the text document, replace three "payoutAddress" with the address.
- Click the mouse button and enter "MN1-Owner" or similar. In the text document, replace three "ownerKeyAddr" with the newly created address.
Transaction
Three commands must be entered: Prepare, Sign, and Send the Provider Registration Transaction. Also note the screenshot shown above as an example of how to do this.
- In DMS Core, use the menu command .
- In masternode.conf go to the line with the corresponding masternode.
- Copy the IP with port (1.2.3.4:41319) and replace "ipAndPort" in the text document.
- Copy the last two values in this line (txid idx) and replace "collateralHash collateralIndex" in the document.
- masternode.conf can be closed.
- Unlock the wallet if it is password protected.
- In the text document, copy the third last line "protx register_prepare ...", paste it into the debug console and press Enter.
- From the result copy the long value "tx" and replace "tx" in the last line of the text document.
- Replace "signeMessage" in the document.
- In the text document copy the penultimate line "signmessage ...", paste it in the debug console and press Enter.
- Copy the result and replace "sig" in the last line in the document.
- In the text document copy the last line "protx register_submit ...", paste it in the debug console and press Enter.
- The result is a transaction ID. In the text document, please replace "protxid" with the ID.
- The wallet can be locked again.
- Please save the text document used as a template in a safe place. The data is needed to make changes - for example, to change the IP.
The transaction is now confirmed by the miners and the masternode is then prepared for DIP0003. It is visible in the Wallet on the tab page and marked accordingly in the block explorer.